
Border ZoneReport
English:Border Zone · Locations
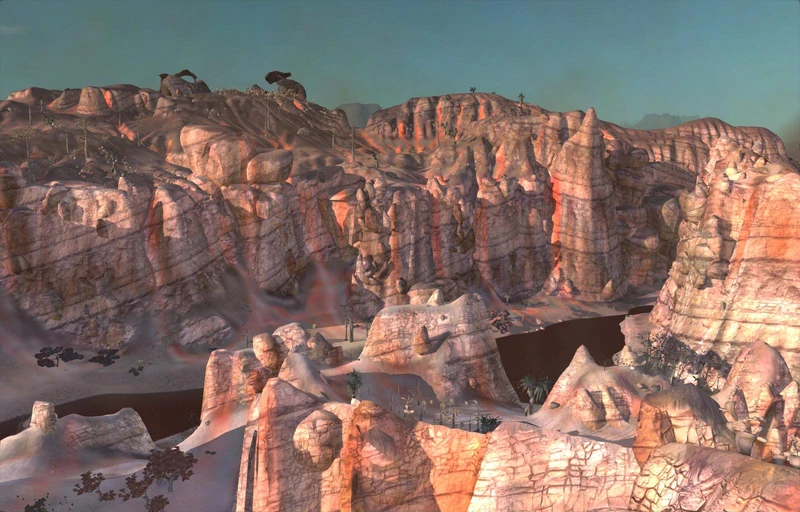
The arid no man's land between the Holy Nation and the Shek Kingdom. No regular patrols but high-quality ore everywhere, which is how it grew the densest bandit ecology on the continent — and it is where the vast majority of players begin.
The Border Zone is an arid stretch of no man's land between the Holy Nation and the Shek Kingdom, lying south of Okran's Pride and east of Vain. The in-game Map of the Border Zone describes it in a single sentence:
A no man's land between the three great nations, where conflict has made civilised settlement impossible.
That one line accounts for both its poverty and its importance.
Why there is no order here
The Border Zone's environmental figures are not bad at all: fertility 100%, water 50%, iron and stone both 100, copper 80. Large quantities of high-quality ore sit right next to the towns — the southern canyons and the western edge near Vain are especially dense, and the southern rim has satellite wreckage that can be dismantled for iron. For a new player, this is the easiest place in the game to turn rock into cash.
The problem is that nobody is responsible for law and order. None of the three great nations treats this as core territory, so there are no standing patrols. The result of that power vacuum is complete bandit control: Starving Bandits and Dust Bandits tear at each other and rob whoever happens to be passing; and if a player builds an outpost here, those two groups plus the Black Dragon Ninjas are the ones who will come to demolish it.
The genuinely organised parties are the Dust Bandits and the Black Dragon Ninjas — both hold the Border Zone as their turf, and it is precisely the two of them together who turned this central corridor of the continent into the grave of countless drifters[V1 0:00:10].
This land once belonged to the Holy Nation, and the abandoned Holy Nation outposts, the small settlements and the ruins of The Hub within it are all remnants of that rule. Note that the game splits the Map of the Border Zone and the Glorious Holy Map into two separate items — implying that the Border Zone was at most a Holy Nation frontier development, and never a core holding.
Settlements and towers
The region holds only two settlements still arguably alive, plus two bandit lairs, a bar and a waystation.
- Squin — a Shek Kingdom town built inside a narrow canyon, due east of the capital Admag. The entire town runs on wind power with no batteries, so blackouts are the norm. Several unique recruits can be encountered in its bar. It is the Shek Kingdom's outpost facing the border.
- The Hub — an old Holy Nation town, taken and burned by the Shek Kingdom and then abandoned by both sides in turn, now squatted by Holy Nation outlaws and trade ninjas. The starting point for most game starts.
- Waystation — a Tech Hunter holding in the south-east of the region, and the only waystation in the game with a Robotics Workshop.
- Rebel Base — a one-building bar town nominally belonging to Holy Nation outlaws, whose residents are in fact all trade ninjas. Its black market bar sells crossbows, weapon blueprints, building materials and food, and buys stolen goods from any faction other than its own.
- Dust King Tower — headquarters of the Dust Bandits, built on a cliff overlooking a river valley, with tier-three walls, five mounted crossbows and a garrison of twenty or more. The Dust King carries a bounty of 35,000 Cats and is wanted by all three great nations; the third-floor cell holds the unique character Cat.
- Tower of Ninjas — den of the Black Dragon Ninjas, in the region's north-east. Its leaders Dimak and Buzan each carry a 20,000-Cat Holy Nation bounty, and the ninja blade Dimak wields is Meitou grade.
Who you meet on the road
The Border Zone's non-outpost spawn table is the most mixed in the game — it has no owner, so anyone can turn up.
Regular appearances include: Starving Bandits (three squad compositions, all carrying the malnourished status), Dust Bandit squads, slave hunters, escaped Holy Servants, herds of Garru and goats, lone Bonedogs, Tech Hunter wanderers, nomad caravans and ninja assassins. A fair number of vagrant "Urchins" are also scattered around.
A further set is governed by world state, appearing only after specific characters die: Kral's Chosen, Holy Nation legion patrols and Holy Army, Shek patrols and Shek Kamikaze, Southern Hive invasion squads, and Western Hive stragglers after the Hive Queen's death.
Starving Bandits: the group you can pay off
Starving Bandits are the most numerous group in the region and simultaneously the weakest. Their members are mostly escaped slaves and people close to starvation, with no organisation, no armour, and only the most basic tier of weapons; they rob you to fill their stomachs, not to get rich[V2 0:02:37].
Precisely because the motive is not malice, they are an enemy you can negotiate with: hand over a small donation and you can usually buy passage[V3 0:15:39]. More notable still is the long-term effect — keep giving and relations can climb all the way to the whole gang turning friendly, after which they will fight on your side[V2 0:02:37]. For an early squad, converting the Border Zone's largest hostile group into reinforcements is often a better deal than beating them down one at a time.
Band of Bones: Shek exiles on the southern rim
The southernmost stretch of the region, where it meets the Stenn Desert, is where the camp of the Band of Bones — the Shek Kingdom's exile faction — is located[V4 0:02:41]. They are among the first Shek splinter groups a player will run into: defeated warriors whose horns were cut and who refused to surrender their blades, led by Tora the Fearless, who carries a redeemable bounty herself.
By Shek standards these people are in fact very weak: their combat stats sit only in the twenties and thirties, worse than the poorest of the Hundred Guardians[V5 0:02:24]. But "by Shek standards" is not the standard of a starting character — in one playthrough a single Band of Bones member wiped out a squad of eleven[V4 0:02:41].
A war you cannot see
At the start of a game, the player sees no open conflict between the Holy Nation and the Shek Kingdom. But lay out the trigger conditions of the world states and another reading emerges.
The life or death of Holy Nation High Inquisitor Seta simultaneously determines whether Shek Kingdom patrols and Kral's Chosen spawn in the Border Zone, and whether Berserkers can appear in Okran's Gulf. More intriguing still: after Seto falls, the Shek offensive has clearly gone into full swing — on a scale large enough to empty their capital — yet so long as Seta is alive, the spawn weight of Shek forces in the Border Zone remains zero. The reasonable inference is that the Holy Nation is holding an invisible defensive line here.
Ludin's Reports records the traffic of scouts on both sides, while the History of Kenshi states plainly that the Shek "continue to treat their neighbours as targets for raiding".
Why it works as a beginner region
The Border Zone is the default starting point for the vast majority of game starts, and it really is the most forgiving patch of ground in all of Kenshi for a factionless drifter:
- The weather will not kill you. Dust storms only affect visibility; unlike the Deadlands, the Black Desert or Venge, they do no direct damage.
- The wildlife is weak. Bonedogs and Garru are easy to fight and easy to escape; step west into Vain or south into The Swamp and Beak Things and Blood Spiders put the threat level in another bracket entirely.
- The cost of failure is low. Being knocked down rarely means dying outright; even getting knocked out breaking into the Dust King Tower just gets you dumped outside the door, unlike places such as Deadcat or the Preacher Cult where you simply lose the character.
- Trading posts are close together. Squin, The Hub, the Rebel Base and the Waystation are all within reach of one another, so looting, thieving and mining can all be converted to cash reliably.
The price is that this land has neither the protection of a great nation nor the dogma of one — and it is only once the player raises an outpost in the middle of the region that the Holy Nation and Shek Kingdom both come knocking. The good news is that they will often fight each other first.
Building a base here
The channel's verdict: Recommended
- Fertility The eastern Border Zone he settles has arid fertility — cactus grows fine, but Paul Rogers says ground like this is not suited to hemp.[V6 0:16:50]
- Fertility Cactus plots go down from day three; the final layout runs three crop lines — wheatstraw, cactus and hemp — leaving the base completely food self-sufficient.[V6 0:10:39]
- Wind The very first things built on arrival are a Storm House and a wind generator, which means local wind is strong enough to power the base directly — no need to lean on biofuel first.[V6 0:05:03]
- Iron An Iron Refinery and a Stone Refinery are built inside the base to produce iron plates and building materials for the turrets and walls (the video does not quote the local ore figures).[V6 0:05:37]
- Raids The visitors on day one were not the expected Dust Bandits but the Black Dragon Ninjas.[V6 0:06:11]
- Raids The site is very close to the Black Dragon Ninja HQ, so there is very little preparation time between them setting out and them hitting your gate.[V6 0:06:44]
- Distance to supplies A Western Hive caravan passes by the base, and Paul Rogers bought a large quantity of wheatstraw, cactus and hemp from it, clearing the material shortfall for expanding the farm plots in one go.[V6 0:11:14]
- Tax Settle the Border Zone and the Holy Nation is very likely to come knocking — not to collect money, but for the weekly Prayer Day ritual.[V6 0:12:20]
- Hazards The local dust storms put a debuff on your characters (Paul Rogers jokes that his squad in the dust storm looks like it wandered out of another game's League of Legends).[V6 0:01:08]
- Distance to supplies There is a waystation right next to the base; on day two he walked over and picked up two more squad members.[V6 0:10:06]
- Distance to supplies A Western Hive caravan passes by the base, and Paul Rogers bought a large quantity of wheatstraw, cactus and hemp from it, clearing the material shortfall for expanding the farm plots in one go.[V6 0:11:14]
- Distance to supplies The Border Zone is close to the centre of the map, so even if you later decide to pack up and move to another region, relocating does not cost much.[V6 0:17:58]
- Other Goats and garru wander into the base on their own, so leather and meat are basically self-sufficient with no shopping trips needed.[V6 0:15:09]
- Iron Iron veins are in healthy supply, and not hard to find either.[V7 0:00:34]
- Iron Iron veins are in healthy supply, and not hard to find either.[V7 0:00:34]
- Distance to supplies Almost any position in the zone is close to a neutral settlement, so when things go wrong there is somewhere to stuff your characters into.[V7 0:06:06]
- Iron Iron veins are in healthy supply, and not hard to find either.[V7 0:00:34]
- Iron Iron veins are in healthy supply, and not hard to find either.[V7 0:00:34]
- Defensible terrain The selling point of that same spot is a large stretch of flat ground — space rather than a terrain advantage, suited to laying out a very large base.[V7 0:07:15]
- Defensible terrain The selling point of that same spot is a large stretch of flat ground — space rather than a terrain advantage, suited to laying out a very large base.[V7 0:07:15]
- Raids Several hostile factions have their headquarters inside the zone, so raids arrive within the first week of the base going up.[V7 0:04:25]
- Distance to supplies The Waystation to the south-east has a robotics shop and a Skeleton repair bed, and it sits right next to his two favourite base sites.[V7 0:01:08]
- Distance to supplies Almost any position in the zone is close to a neutral settlement, so when things go wrong there is somewhere to stuff your characters into.[V7 0:06:06]
- Distance to supplies The Waystation to the south-east has a robotics shop and a Skeleton repair bed, and it sits right next to his two favourite base sites.[V7 0:01:08]
- Other The location is central, so if you later want to move to a harder region, it is not a long trip.[V7 0:08:22]
Video citations
- Kenshi Colosseum: Dust Bandits VS Black Dragon NinjaHeroInHisHead
- History of Kenshi: Minor Powers | Gangs and Bandit CrewsCivilizationEx
- History of Kenshi: Minor Powers | DocumentaryCivilizationEx
- Kenshi | WE ARE DWARVES!! | Let's Play Kenshi Genesis (Ep. 1)HeroInHisHead
- The Origins of the Shek ExilesHeroInHisHead
- The ONLY Base Guide You Need in KenshiPaul Rogers Gaming
- Why You Should Settle The Border Zone | Kenshi Location GuidePaul Rogers Gaming