
BuildingsReport
English:Buildings · Items & Equipment
A complete list and spec sheet for constructible buildings: fifteen categories, the materials and door health of the thirteen building shells, the stacking multipliers of storage containers, and special installations such as the Prisoner Cage and the Peeler Machine.
This page is the list and spec sheet for constructible buildings. For site selection, tax events, raids and the jobs system see Base Building / Outposts; for production-line recipes at the benches see Crafting & Farming.
Build Mode sorts buildings into fifteen categories: building shells, camping, crafting, defence, farming, food, interior, lighting, mining, power, storage, tech, training, walls, and a "laboratory" category with a single entry (the Peeler Machine). Three materials carry all of it: building materials (a Stone Processor turns 2 raw stone into 1, average price 108 Cats), iron plates, and copper alloy plates (used only by the two outposts).
The thirteen building shells
| Shell | Materials | Build hrs | Research | Building HP | Door HP |
|---|---|---|---|---|---|
| Small Shack | 5 bld. mat. | 0 | none needed | 5 | 12 |
| Storm House | 16 bld. mat. | 3 | Shacks | 16 | 16 |
| Longhouse | 24 bld. mat. | 4 | Medium Building Shells | 24 | 16 |
| Stephouse | 30 bld. mat. | 5 | Large Building Shells | 30 | 16 |
| Bughouse | 35 bld. mat. | 6 | Medium Building Shells | 35 | 16 |
| L-House | 35 bld. mat. | 6 | Medium Building Shells | 35 | 16 |
| Y-House | 35 bld. mat. | 6 | Large Building Shells | 35 | 16 |
| Snailhouse | 40 bld. mat. | 7 | Large Building Shells | 40 | 16 |
| Stationhouse | 40 bld. mat. | 7 | Large Building Shells | 40 | 16 |
| Watchtower | 60 bld. mat. + 10 iron plates | 12 | Large Building Shells | 70 | 16 |
| Outpost s-III | 20 bld. mat. + 20 copper alloy plates | 7 | Advanced Outpost Blueprints | 40 | 40 |
| Outpost s-IV | 30 bld. mat. + 30 copper alloy plates | 10 | Advanced Outpost Blueprints | 60 | 50 |
| Outhouse | 1 bld. mat. | 0 | Random Furniture Blueprints | 1 | always open |
Points that matter when comparing them one by one:
- The Small Shack is the only shell needing no research, and the only one that will fit nothing bigger than a tier I Small Research Bench — but that is enough to start the whole tech tree. Small Shacks for sale in towns originally house an NPC, and trespassing before purchase will get you attacked.
- The Storm House is the best early investment: barely three times the price of a Small Shack for 4–5 times the usable floor, plus an open-topped second storey that takes a Small Wind Generator, a Rain Collector and plenty of Mounted Crossbows.
- The Longhouse is underrated value: 24 building materials buys total floor area close to the 35-material class, and three of them cost the same as two buildings of that tier. The drawback is the large "dead zone" it creates all around, making it hard to build anything alongside. The Y-House is essentially its strict upgrade — the central dome is impassable, but the floors on its three arms lay out better than the similarly priced Bughouse or L-House.
- The Stationhouse offers the largest usable floor in the game; the Snailhouse has awkward curved surfaces and a mostly roofed second storey, suiting only compact bases chasing "small footprint, big interior", at the cost of a roof that will barely take a wind generator or rain collector.
- The Stephouse and L-House have split-level ceilings connected by ladders. Lights mounted high do not illuminate the floor directly below, so you need separate ground-level fixtures.
- The Watchtower's value is not its HP (building HP does nothing in game) but its height and terrain tolerance: four storeys give turrets a huge elevation bonus, and it can be squeezed onto clifftops, rock shelves and other spots where no other building will place at all.
The Outpost s-IV is the only genuine fortress: door health 50 and a level 100 door lock (everything else is level 15), and its second-storey outer walkway counts as "interior", so you can put beds and small research benches there and — more importantly — mount turrets to fire downward. The s-III's outer ring is judged "exterior", so it takes neither interior buildings nor turrets. That is the crucial difference between them, and nothing in the material costs hints at it. The s-III also has a ceiling that is too low, so a Heavy Armour Smithy will not fit on its ground floor.
The research chain: Shacks → Medium Building Shells (tech level 2, 6 books) → Large Building Shells (tech level 3, 1 Engineering Research). Outposts take a separate route: Heavy Building Foundations (1 Engineering Research, which unlocks nothing by itself) + Advanced Outpost Blueprints (15,000 Cats, bought from building-material or tools traders).
Camping: does not create a player town
Camping buildings have one decisive property: they do not establish a player town, and so they do not bring tax collectors, extortionists or raid events down on you.
| Building | Materials | Use |
|---|---|---|
| Campfire | 0 | Raw meat → dried meat, buildable anywhere |
| Camp Bed | 1 sleeping bag | 4x healing; dismantling recovers the sleeping bag |
| Scrap Tent | 1 animal skin | Keeps out rain (including acid rain) |
| Mercenary Tent | 1 fabric | Keeps out rain |
| Flat Shelter | 1 fabric | Keeps out rain, common on United Cities rooftops |
All three tents need blueprints; the campfire and camp bed do not. A sleeping bag plus a campfire thrown down on the spot is a complete field supply and medical system.
Walls, gates and ramps
| Tier | Materials | Build hrs | Turret bonus | Door HP |
|---|---|---|---|---|
| Makeshift wall / gate | 1 / 5 bld. mat. | 1 / 12 | — | 15 |
| Defensive wall / gate II | 2 / 10 bld. mat. | 2 / 12 | 0% | 30 |
| Defensive wall / gate III | 3 / 15 bld. mat. | 3 / 15 | 10% | 60 |
| Defensive wall / gate IV | 4 / 20 bld. mat. | 4 / 20 | 20% | 90 |
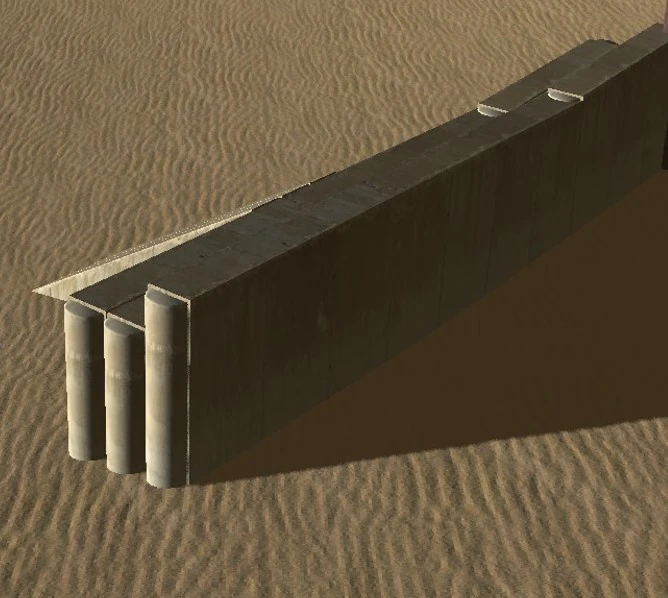
Makeshift walls cannot be walked on and take no turrets; from tier II they are passable and turret-capable, tier III adds battlements for partial cover, and tier IV has firing slots and Mounted Crossbow positions. The upgrade path is not continuous: makeshift goes straight to II and III goes straight to IV, but II cannot be upgraded directly to III. Ramps come in tiers II / III / IV and exist to get defenders onto the wall.
Storage containers
General containers (General Storage Chest / cupboard) are 18×18 with ×5 stacking; the Metal Chest is 12×12 and does not stack; dedicated containers have few cells but extremely high stacking multipliers:
| Multiplier | Container |
|---|---|
| ×250 | Storage: Greenfruit / Hemp / Riceweed / Wheatstraw |
| ×100 | Storage: Meat / Animal Skin / Cactus / Cotton / Raw Stone / Ore / Copper / Building Materials / Fuel, Water Tank |
| ×50 | Bread Basket, Flour Storage, Fabric Chest, Storage: Leather / Iron Plates / Copper Alloys / Hashish |
| ×25 | Boltbox, Storage: Armour Plate / Chainmail / Crossbow Parts / Steel Bars / Electricals, all three booze barrels |
| ×5 | General Storage Chest and cupboard, Medicrate, Storage: Robotics |
| ×4 | Food Store, Shop Counter |
| ×0 | Metal Chest, Armour Storage, weapon cupboard, Weapon Stand, Crossbow Locker, Animal Feeder |
The real value of dedicated containers is automation: labourers move output into the matching store automatically, crafters draw materials from that same store, and assigning the "haul" job lets an entire production line run itself.
Three special containers: the Food Store and Bread Basket are drawn on automatically by hungry characters (the Food Store, oddly, cannot hold bread); the Shop Counter (4 building materials, requires the Public Sales research) — without a counter it is not a shop, and no NPC will come, provided both the building and the town are open to the public.
Production, utilities and tech
Research benches upgrade in place without demolition, but the Small Research Bench is a dead end:
| Tier | Materials | Power | Efficiency |
|---|---|---|---|
| Small Research Bench | 3 bld. mat. | 0 | — |
| Research Bench II | 10 iron plates | 0 | 90% |
| Research Bench III | 20 iron plates | 10 | 95% |
| Research Bench IV | 25 iron plates | 15 | 100% |
| Research Bench V | 30 iron plates | 25 | 105% |
| Research Bench VI | 35 iron plates | 30 | 110% |
Crafting buildings split into a "production" group and a "crafting" group: the former is the Chainmail Sheet Fabrication Bench, Copper Alloy Bench, Electrical Workbench, Fabric Loom, Item Furnace, Leather Tanning Bench and Plate Beater; the latter is the Arrow Making Bench, Chain Armour Crafting Bench, Clothing Bench, Crossbow Crafting Bench, Heavy Armour Smithy, Leather Armour Crafting Bench, Medical Workbench, Robotics Bench, Skeleton Limb Bench and Weapon Smithy.
Three water options: the Well (5 bld. mat. / 1 worker / 75%; tier II is 6 bld. mat. + 4 iron plates, needs no worker, draws 8 power, 100%; tier III is 125%), the Rain Collector (4 iron plates, fully automatic and power-free, the only water source that can be built inside a town property, but it cannot collect acid rain), and the Water Tank (3 iron plates, stores 100 units, labelled exterior but actually placeable indoors too).
Hydroponics: the initial research costs 1 AI Core, and each crop then costs 4 Ancient Science Books; the finished bed is 4 iron plates + 2 electrical components + 10 units of the matching crop. It escapes environmental limits entirely, growing greenfruit, hemp, riceweed and wheatstraw indoors and in any region, and it can be watered by acid rain — the key to rooftop farms in the Deadlands. The cost is water and power.
The Corpse Furnace (8 iron plates) destroys corpses and everything on them; corpses attract predators and predators eat you, which is the game's own official rationale for it. Lighting is more than atmosphere too: insufficient light penalises mining, bench production and combat alike. The low-tech answer is the Torch Post, the high-tech ones are the power-hungry Light Post, Searchlight and indoor lamps.
Interior and special installations
A Bed (1 bld. mat. + 4 fabric) gives 8x organic healing speed and cuts the sleeping character's hunger rate to a third; the Skeleton Repair Bed (2 copper + 5 electrical components + 4 iron plates, research cost 2 Engineering Research) gives 8x on mechanical parts, 2x on blood/oil, and clears wear.
Prisoner Cage: 5 iron plates, requires Imprisonment level 3 research, and player-built cages always have a level 15 lock. Two pitfalls you have to know — base raiders will always try to free your prisoners (even ones with no connection to them may slip off to open the cage while you are fighting), so cages belong inside a locked building or a sealed area; and there is a long-standing bug where a prisoner can vanish into thin air if you spend too long in another zone while the game saves. The practical countermeasure is to leave a Skeleton, who needs no food, permanently watching them.
Peeler Machine: 1 building material, needs no power, and mechanically equivalent to a cage (putting someone in counts as imprisonment and costs the same faction relations), but it strips the victim's clothing, limbs and vitals in three stages and produces animal skin — it will even peel a Skeleton. It belongs to the Skin Bandits, and the blueprint can be obtained from the Savant. Player-built ones are dangerous too: walking into one injures you exactly as though you were locked inside, and reacting too slowly will destroy the armour you are wearing.
Town property
Buying a house in town is an underrated opening strategy: town guards absorb events for you, no player town is created, and the roof takes a Small Wind Generator. Houses marked "ruined" are cheaper — right-click "repair" to rebuild them with building materials — but once bought they cannot be resold. Set to "public", guards patrol and residents can come in to buy; set to "private", residents will not enter, and a Shop Counter therefore sells nothing.
Placement and property pitfalls
None of the following is visible in the build interface; you only hit them by actually building.
A building sunk too deep gets spat back out by the engine. Press a structure too far into the terrain and it will pop back up to ground level after a save and reload — and it pops again on every reload. The workable fix is not to bury a staircase into a hillside but to switch to a swamp platform, which comes with support posts underneath, and raise everything on that[V1 0:31:39].
An "open-air platform" counts as interior to the engine. Platforms like the swamp ones, with no roof overhead, are still interior units as far as placement goes. Torches, tables, cages and the like can only go down in interior edit mode — plenty of people conclude "torches can't go here", and this is the real reason[V1 0:48:16].
That metal arch bridge is a shared asset. The bridge in the Deadlands leading to the Scraphouse and the one connecting the Bonefields valley to the Fishman Islands are in fact the same bridge. Players who place it themselves with shift+F12 find that characters can only walk about three quarters of the way before getting stuck, presumably because the navmesh does not generate at that height[V2 0:10:48].
Related articles: Base Building / Outposts, Crafting & Farming, Books & Research Artifacts, Food & Medical Items.
Video citations
- Kenshi Base Building - The GutterHeroInHisHead
- Kenshi Base Building - Dwarf FortressHeroInHisHead
- Kenshi Base Building - Gate of VengenceHeroInHisHead